How to use The Pocket Chemist molecule stencil, pocket ruler and chemistry reference
*Did you purchase this on Amazon? Join our direct customers and get access to our curated list of resources for chemists and chemistry students.
...
The Pocket Chemist was designed by Genius Lab Gear to help chemists and chemistry students quickly and neatly draw chemical reactions so they can spend time thinking about the chemistry, not how to draw polygons. If you are a lucky holder of The Pocket Chemist, the below instructions will illustrate how to use every single feature, even some you might not know exist!
![]()
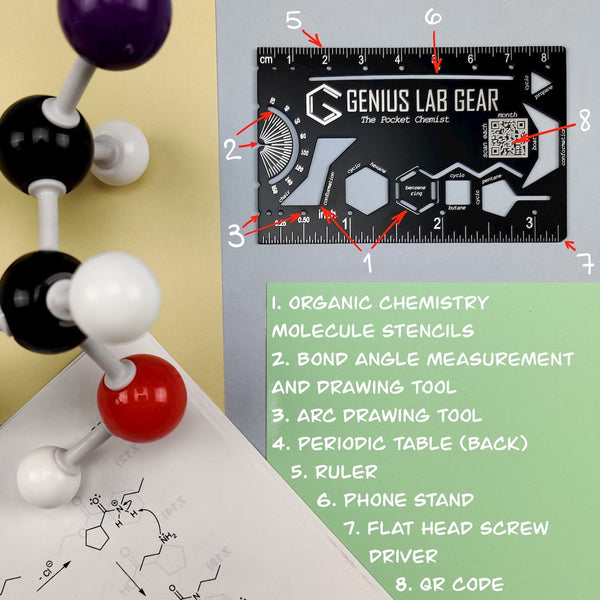
1. Organic chemistry molecule stencils
Use these stencils to quickly and neatly draw cyclohexane, cyclopentane, cyclobutane, cyclopropane, benzene rings, chair conformations and boat conformations. To complete your chair conformation and a ring flip, see our other post on “The easiest way to draw a cyclohexane chair conformation and ring flip.”
To effectively use the benzene ring stencil, first start by drawing the outer hexagon using the cyclohexane stencil. Then, slide The Pocket Chemist to the left so that the hexagon you drew is visible in the three outermost sides of the benzene ring stencils (upper right, left, lower right) and the laser-engraved thin lines overlap the other three lines that are hidden. When it’s aligned, draw the three inner bond lines. You can adjust the spacing to the outer ring by tilting your pencil inward or outward as you draw. If needed, use the carbon chain stencil to continue your molecule!

Photo courtesy of @OchemTutor - Organichemistrytutor.com
2. Protractor and angle drawing tool
The left front contains a 180 degree arc for measuring and drawing bond angles. Every 20 degrees are annotated. The long lines are every 10 degrees and short lines are every 5 degrees. The straight line cutout denotes 90 degrees and can help to quickly draw right angles.
To draw or measure your own angle:
- Align a starting straight line to the flat edge on the outside of the tool.
- Add a center dot to denote your vertex, in the gap at the center of the arc tool.
- Add a dot at the angle you wish to draw. If measuring, find the angle where the line to be measured intersects.
- Slide away The Pocket Chemist and use the straight edge to connect your dots and complete your angle.
3. Compass for drawing arcs (in inches and centimeters)
The through holes lined up with major inch and centimeter markings are for drawing arcs and circles of the corresponding radii.
To draw a 6 centimeter radius 60 degree arc:
- Create a vertex, 0 degree and 60 degree dots using the angle drawing tool described above
- Line up the half-hole at 0 cm to your vertex dot and the 6 cm hole to your 0 degree angle dot.
- Using two pencils (or one pencil and a sharp narrow object), put one in each hold and with a slight inward pressure drag the 6 cm hole in the desired direction until it covers approximately 60 degrees. Keeping slight inward pressure ensures the arc does not come out jagged.
- Use the straight edge to connect your vertex and 60 degree dots, then extend the line out until it intersects your new arc. Simply put a dot at the intersection if you don’t want the connecting line.
- Erase any arc past the intersection point.
To draw an arc with a 0.5 cm, 0.5 inch, 0.25 inch or 0.125 inch increment:
- Repeat step 1 above.
- Instead of using the edge half-hole, start your vertex at the sub-integer hole and count forward to the desired radius, remembering to subtract the distance from the edge to the hole of your vertex.
- Repeat steps 3-4 above.
4. Periodic table
The back of The Pocket Chemist contains a full periodic table. The Lanthanide and Actinide series’ are at the bottom and a double-thick vertical line denotes where they are inserted in the upper periods. The left side contains a quick reference atomic number for the Group I elements and the space above the table shows the full electron configuration for Krypton to help you decipher configurations of elements before and after it. For Group and Period, simply count left-to-right and top-to-bottom respectively.
5. Ruler
The centimeter side is marked to each 1, 5 and 10 mm while the inches side is marked down to the 1/32nd inch where each smaller unit has a shorter mark line. Note that the origin (zero) side starts flat (flush) to the edge of the tool. This allows you to easily measure the height or depth of an object on a flat surface. For the highest precision on paper, start your line at the “1” marking instead of the edge.
6. Flat head screw driver
The end of the inch ruler is an angled flat for use as a flat head screw driver when you’re in a pinch. It won’t work will all screw sizes, shapes and depths but will be useful in most situations. The card is stainless steel and quite sturdy but take care not to over-torque it or it may start to bend.
7. QR Code for bonus content
Scan the QR code with your phone each calendar month to view a private page just for card holders. This QR code is obscured in product photos online, so think of this as an exclusive bonus of being a card holder! Each month, we’ll replace the page with new content such as fun science nuggets, science jokes, new resources we’ve found or created, news or upcoming events and discounts on new product launches just for card holders! Our goal is to bring you value, fun and happiness with every scan.
Did you know we also have an "Exam Edition" without all of the reference info so you can use it on exams? Grab it before your next one from The Pocket Chemist product page!

1 Response
Leave a comment
Comments will be approved before showing up.


What Size Lab Coat Should You Get?
Most lab coats fit badly because people order their regular clothing size instead of measuring. Here's exactly how to measure your chest, waist, and hips, what to do if you land between sizes, and why the Louis and Curie fit so differently.


How to Stay Cool While Wearing a Lab Coat All Day
Stay comfortable during long days in the lab with practical, safety-conscious tips to reduce heat and sweat while wearing a lab coat. Learn what to wear, what to avoid, and how to stay cool without compromising protection.


Mad Scientist DIY Costume Ideas: How to find a lab coat to win Halloween
Looking to create a Mad Scientist costume that’s more legendary than last-minute? Skip those flimsy party-store outfits with see-through polyester and plastic buttons. No self-respecting villain would wear that garbage. The secret to nailing the Mad Scientist look is starting with a real lab coat, and we’ve got the perfect one.
Amal
October 12, 2022
I have had my pocket chemist for a few weeks now and I love it! My structures look so clean and professional! My favorite aspect is the chair! Could never get those right, now I don’t have to worry about it!